
How to Edit Master Slides in Google Slides & PowerPoint (Step-by-Step)
To edit the master slides in our SlidesBrain templates, open the file in PowerPoint or Google Slides, go to the View menu, select Slide Master (PowerPoint) or Edit theme (Google Slides), then update fonts, colors, logos, and layouts from that master view. Every change you make there applies automatically to every slide built on that layout, so you only need to set it once.
Every template we design at SlidesBrain is built on a proper master slide structure, not just individually styled slides that happen to look consistent. That structure is what makes our templates fast to customize. Once you understand how to work with it, rebranding an entire deck takes minutes instead of hours. Here’s exactly how to do it, in both PowerPoint and Google Slides.
Why Are Our Templates Built This Way?
A lot of free templates online are just a set of slides someone styled to look uniform. Ours are different. Every SlidesBrain template is built with a real master slide underneath, meaning fonts, colors, logo placement, and footer elements all live in one central layout that every other slide inherits from.
This matters the moment you need to change something. If you want to swap our default color palette for your brand colors, or replace our placeholder logo with yours, you shouldn’t have to touch fifteen individual slides. With our master structure, you touch one slide, and the rest follow.
Editing the Master Slide in PowerPoint
- Open your downloaded SlidesBrain template in PowerPoint.
- Go to the View tab and click Slide Master. This opens the master editing view, with the master slide at the top of the left panel and its associated layouts beneath it.
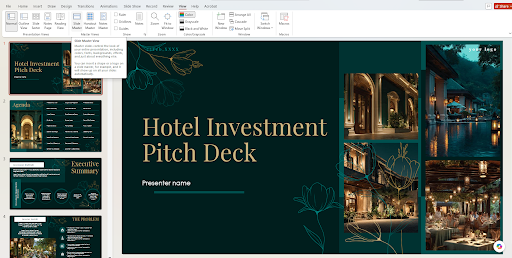
3. Select the top master slide first. Changes made here affect every layout below it, so start with the elements you want everywhere, like your logo, footer text, or overall font choice.
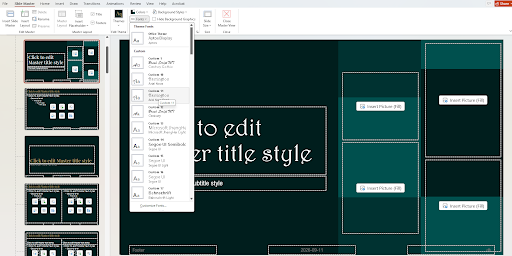
4. Update fonts using the Fonts dropdown in the Slide Master tab, or select text placeholders directly and change them manually.
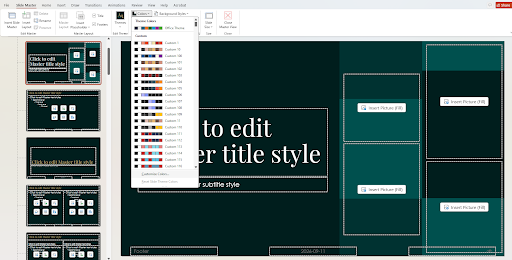
5. Update colors using Colors in the Slide Master tab to shift the entire palette at once, or click individual shapes to recolor specific elements.
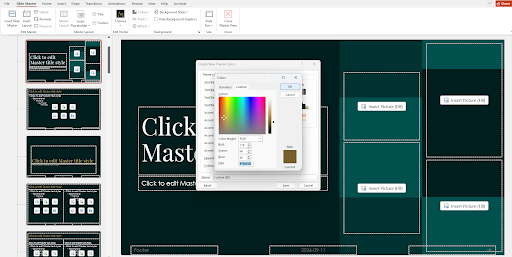
6. vClick on any of the individual layouts beneath the master, like Title Slide or Two Content, to adjust placeholder positions or styling specific to that layout only.
7. When finished, click Close Master View on the far right of the ribbon to return to your normal editing screen.
Every slide in your deck built from an edited layout updates immediately. If you add new slides afterward, they’ll pull from your updated master automatically.
Editing the Master Slide in Google Slides
1. Open your SlidesBrain template file in Google Slides. If you downloaded it as a PowerPoint file, upload it to Google Drive first import Slides and upload to Google Slides.
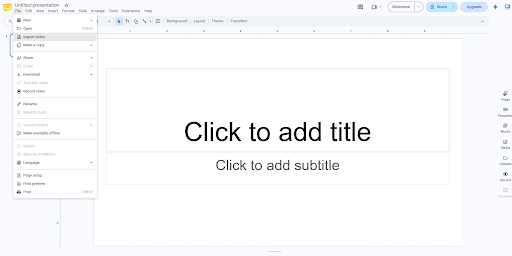
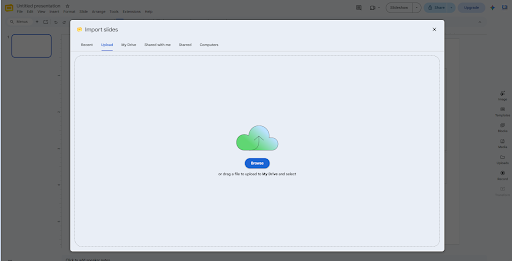
2. Click Slide in the top menu, then select Edit theme. On some accounts this appears as Theme builder under the View menu.
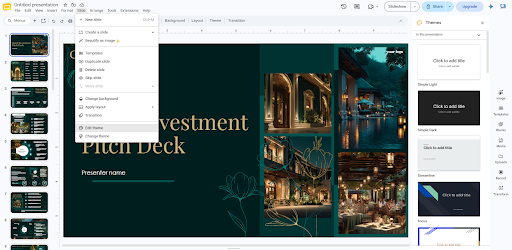
3. The top slide in the editor is your master. Update fonts, colors, and any logo or footer elements here first, since these changes apply everywhere.
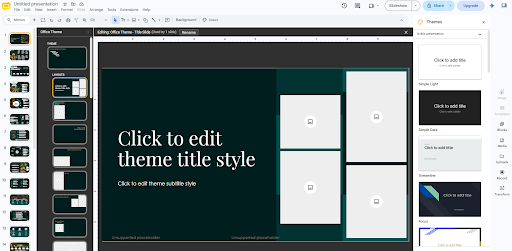
4. Scroll through the individual layouts beneath the master, such as Title and Body or Section Header, and adjust placeholder positions or styling unique to each one.
5. Click the X in the top right corner to exit theme editing and return to your presentation.
As in PowerPoint, any slide using an edited layout updates right away, and new slides you add afterward will follow the updated theme by default.
What to Customize First?
If you’re short on time, prioritize in this order. These four changes cover most of what makes a template feel like your own.
- Brand colors – Update the theme color palette so every chart, shape, and accent element matches your brand instead of ours.
- Logo placement – Replace our placeholder logo with yours on the master slide so it appears consistently across every slide.
- Fonts – Swap our default typography for your brand fonts, or a close alternative if your exact font isn’t available in Google Slides or isn’t licensed for PowerPoint.
- Footer and page numbers – Update any placeholder text in the footer, like a company name or confidentiality note, directly on the master so it’s correct across the whole deck
Once these four are set, the rest of the customization, like swapping images or editing body copy, happens at the individual slide level and won’t need to touch the master again.
Where the Master Slide Lives in Our File Structure?
Every SlidesBrain template follows the same underlying structure, whether it’s a business deck, a pitch template, or an education theme. The master and its layouts sit above your content slides, and each content slide is tagged to one specific layout. Understanding this relationship makes troubleshooting much easier.
For example, if our template includes a Title Slide, a Section Divider, a standard Content layout, and a Closing Slide, each of those has its own entry in the master view. Editing the top-level master changes shared elements like fonts and logos across all four. Editing one specific layout, like the Section Divider, only changes slides tagged to that layout.
This is worth checking before you start editing. Click through each layout in the master view once so you know what’s already built into the template before you start changing things.
Working With Our Color and Font System
Our templates are built with a defined color and font system rather than random one-off styling, which is what makes brand swaps so quick. In PowerPoint, this shows up as Theme Colors and Theme Fonts, both editable from the Slide Master tab. In Google Slides, the same system appears under the Colors and Fonts options inside the Edit theme.
When you update a theme color instead of manually recoloring individual shapes, every element already tied to that color slot updates automatically, including chart elements, icons, and accent shapes throughout the deck. This is the fastest way to rebrand a full template in one pass, and it’s why we recommend starting there before touching anything else.
Common Questions While Editing Our Master Slides
My changes aren’t showing up on some slides.
This usually means those slides are using a different layout than the one you edited. Right-click the slide in the panel, choose Layout, and confirm it’s assigned to the layout you updated.
I accidentally changed something on the wrong layout.
Use Ctrl+Z or Cmd+Z immediately to undo. If you’ve already saved and closed, it’s worth keeping an unedited copy of the original template on hand so you can compare or start over on that section.
The fonts look different after I open the file on another computer.
This happens when a font isn’t installed on that machine. Stick to Google Fonts or widely available system fonts if the file will be opened or edited by other people.
Can I add new layouts that weren’t in the original template?
Yes. In both PowerPoint and Google Slides, you can duplicate an existing layout inside the master view and modify the copy, which is often faster than designing a new layout from a blank slide.
Keeping Your Edited Template for Future Use
Once you’ve customized the master slide to match your brand, save that version separately as your own starting file rather than editing our original download every time you start a new project.
- Save a copy labeled clearly as your branded master, separate from the original SlidesBrain download.
- Duplicate that branded file for every new presentation instead of starting from scratch or re-editing the original template.
- If your team shares the file, keep one protected master version and have each person work from their own copy.
This turns a single template purchase or download into a reusable design system for every deck you build afterward.
If you haven’t picked a starting template yet, browse our PowerPoint templates to find a layout that’s closest to what you need before you start customizing. Starting from a design that’s already close to your brand means less master slide editing overall, since you’re adjusting details instead of rebuilding the structure.
Final Thoughts
The master slide is the fastest way to make any of our templates feel like it was built specifically for your brand. Instead of editing each slide individually, a few changes at the master level carry through the entire deck automatically.
If you run into a template that doesn’t quite fit what you need, our full template library covers a wide range of industries and presentation types, so there’s usually a closer starting point available before you need to build extensively from scratch.
Frequently Asked Questions
Do I need the paid version of PowerPoint to edit the master slide?
No. Slide Master editing is available in every version of PowerPoint that supports standard editing, including PowerPoint Online for Microsoft 365 subscribers.
Will editing the master slide break the original template design?
No, as long as you’re working from your own copy. We recommend saving a duplicate before editing so the original download stays untouched as a reference or backup.
Can I use our templates in both PowerPoint and Google Slides?
Yes. Our templates are built to work in both platforms. If you download the PowerPoint version but work primarily in Google Slides, just upload the file to Google Drive and open it with Google Slides.
How long does it usually take to fully rebrand one of your templates?
Most users update colors, fonts, and logo placement on the master slide in under fifteen minutes. The rest of the customization depends on how much content you’re adding or replacing.