
How to Create a Master Template in Google Slides (Step-by-Step)
To create a master template in Google Slides, open your presentation, go to View, then Theme Builder, or Slide, then Edit Theme. From there you can set fonts, colours, backgrounds, and layouts once, and every slide built from that theme will follow the same design automatically. It takes about ten minutes to set up and saves hours on every deck you build afterward.
That’s the quick version. But a master template is only useful if it’s built properly from the start, with layouts that actually match how you present, not just a color scheme dropped on top of default slides. Here’s a full walkthrough of building one in Google Slides, plus the mistakes that make people abandon their master template halfway through a project.
What a Master Template Actually Is?
In Google Slides, the master template is called the theme, and it works through what’s known as the Slide Master (accessible through Slide, then Edit theme). This master controls the design DNA of your entire presentation. Change the font on the master, and it updates across every slide that uses that layout. Change a color, and every element tied to that color updates too.
Beneath the main master slide sit individual layouts, like Title Slide, Section Header, Title and Body, or Two Columns. Each layout inherits the master’s fonts and colors but can have its own arrangement of placeholders. This two-level system is what makes Google Slides templates reusable instead of a one-off design you have to rebuild every time.
Step 1: Open Theme Builder
- Open a new or existing Google Slides file.
- Click Slide in the top menu, then select Edit theme. On newer accounts this may appear as ‘Theme Builder’ under the View menu.
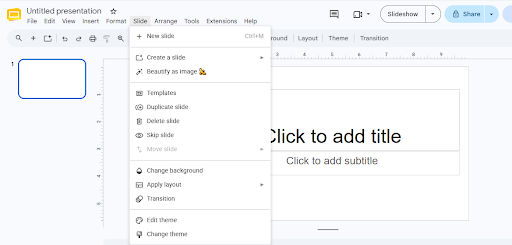
- This opens a split-screen editor. The left panel shows all your layouts, and the main panel shows the master slide currently selected.
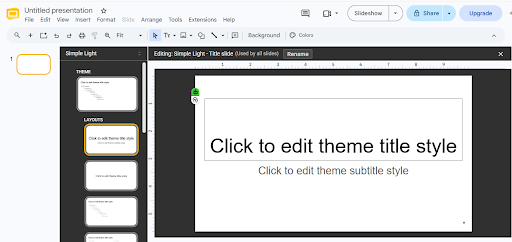
Everything you set on the top master slide, the one labeled simply as the theme, cascades down into every layout beneath it, so start there before touching individual layouts.
Step 2: Set Your Core Colors
- With the master slide selected, click the Colors dropdown in the toolbar.
- Choose Customize theme colors at the bottom of the palette.
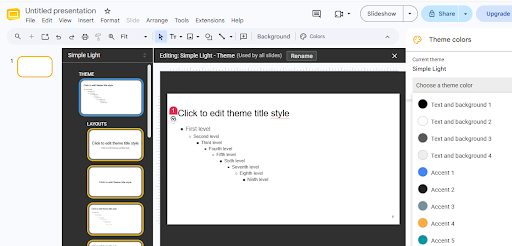
1. Set your primary, secondary, and accent colors, along with light and dark background variants. Stick to two to three core colors plus a neutral for text and backgrounds.
Once these are set, every shape, chart, and text element you insert later can pull directly from this palette instead of you manually re-entering hex codes on every slide.
Step 3: Set Typography
- Select the title placeholder on the master slide and choose your heading font, size, and color.
- Select the body placeholder and set your body font. Keep it different enough from the heading font to create visual hierarchy, but from the same font family if you want a cohesive look.
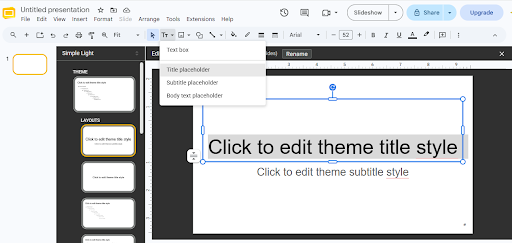
1. Repeat this for any other text placeholders on the master, like subtitles or captions.
A common mistake here is picking a decorative or licensed font that looks great on your machine but renders differently or gets replaced when someone else opens the file. Stick to Google Fonts or standard web-safe fonts if the deck will be shared or edited by other people.
Step 4: Build Out Individual Layouts
Once the master is set, work through the layouts on the left panel one at a time. Google Slides gives you a default set, but you don’t need to fill in every one. Focus on the layouts you’ll actually use.
- Title Slide: your opening layout with company or presentation name and a subtitle.
- Section Header: a divider slide used to break a long deck into clear parts.
- Title and Body: your standard content slide for most of the deck.
- Two Columns: useful for comparisons or before-and-after content.
- Caption or Big Number: useful for a single statistic or quote slide that needs visual weight.
For each layout, add placeholders for text, images, or charts in the positions you want them to default to. Add your logo to a fixed position across every layout using the master slide so it doesn’t need re-adding slide by slide.
Step 5: Add a Logo and Consistent Footer Elements
1. On the master slide, insert your logo as an image, positioned in a corner that won’t interfere with content, typically bottom-right or top-left.
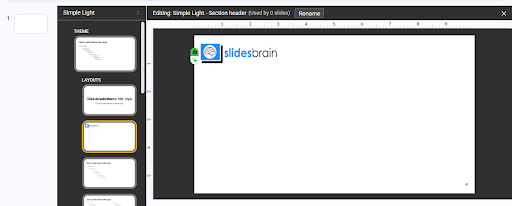
1. Add a footer text box if you need slide numbers, a date, or a confidentiality note, and set it on the master so it appears everywhere automatically.
2. Lock the sizing and position of these elements by keeping them only on the master and layouts, not manually re-added on content slides.
This is one of the biggest time savers of building a proper master template. Once your branding elements live on the master, you never have to think about them again on any individual slide.
Step 6: Exit Theme Builder and Apply Layouts
Once your master and layouts are built, click the X in the top right of the theme editor to return to your normal presentation view. From here, every new slide you add through the plus icon will let you pick from your custom layouts instead of Google’s defaults.
To apply a layout to an existing slide, right-click it in the slide panel, choose Apply layout, and select the one you want. Existing content usually maps into the new placeholders automatically.

Turning Your Template Into a Reusable File
Once you’ve built a master template you’re happy with, save it as a starting point for future decks rather than rebuilding it each time.
- Go to File, then Make a copy, and save an untouched version labeled as your master file.
- For every new project, duplicate that master file instead of starting from a blank presentation.
- If you work with a team, share the master file with edit access disabled to everyone except whoever owns the design, so the theme doesn’t drift over time.
- Consider publishing it internally as a shared template if your organization uses Google Workspace, so anyone on the team can start from the same base.
If you’d rather skip the setup entirely, starting from a professionally built theme is usually faster than building one from a blank file, especially if design isn’t your main focus. SlidesBrain’s PowerPoint templates work in Google Slides as well, with color systems, typography, and layout structures already built out. You can drop the file into Google Slides, adjust the theme to your brand colors, and have a fully functional master template without building the layout system from scratch.
Common Mistakes to Avoid
- Skipping the master and editing slides directly. Changes made slide by slide don’t update anywhere else. If you find yourself fixing the same thing on every slide, that change belongs on the master instead.
- Using too many fonts and colors. A master template works best with a small, disciplined set of styles. More than three colors and two fonts usually starts to look inconsistent rather than rich.
- Building layouts you’ll never use. Google Slides ships with more default layouts than most decks need. Focus your setup time on the four or five you’ll actually reach for.
- Not locking the master file. If your master file is editable by everyone on a team, small unapproved changes tend to accumulate. Keep the source file protected and have people duplicate it instead.
Final Thoughts
A master template turns Google Slides from a blank canvas into a real design system. Once your fonts, colors, and layouts are set at the theme level, every deck you build afterward starts from a consistent, professional foundation instead of a blank slide and a guess at what looks right.
If building that system from scratch isn’t the best use of your time, starting from an existing design does the same job faster. SlidesBrain offers templates built for both PowerPoint and Google Slides, so you can bring in a polished layout system and adjust it to your brand instead of designing one from a blank file.
Frequently Asked Questions
Can I create a master template in Google Slides for free?
Yes. Theme builder is included in every Google account at no cost, whether you’re on a personal Gmail account or Google Workspace.
Can I import a PowerPoint template into Google Slides and use it as a master?
Yes. Upload the PowerPoint file to Google Drive, open it with Google Slides, then go to Slide, then edit the theme to adjust it as your master goes forward.
How is a Google Slides master template different from a regular template?
A regular template is a single pre-designed file you copy and edit. A master template is the underlying system, fonts, colors, and layouts, that controls every slide built from that file, so changes apply everywhere at once.
Can multiple people use the same master template?
Yes. Share the master file with view-only or comment access, and have each person make their own copy to edit. This keeps the original template consistent for the whole team.