
How Do I Customize a Google Slides Template? A Complete Step-by-Step Guide
Picking a template is the easy part. Making it feel like yours is where most people get stuck. If you have ever downloaded a beautiful Google Slides template and then stared at it wondering where to even start, this guide is for you.
Customizing a Google Slides template is not about design talent. It is about knowing which buttons to click and in what order. Below, we walk through exactly how to do it, from opening the file to exporting a presentation that looks like you hired a designer.
Quick Answer
To customize a Google Slides template, open it in Google Slides, then edit the theme colors and fonts through the “Theme” panel, replace placeholder text and images with your own content, adjust the slide master for global changes, and use the “Insert” menu to add charts, icons, or logos. Save your work automatically syncs to Google Drive, and you can export the final version as a PDF or PPTX file when you are ready to present.
Step by Step Guide to Customize Google Slides Template
Step 1: Open and Make a Copy of the Template
Before touching anything, always duplicate the template first. This protects the original in case you want to reuse it later or start over.
- Open the template in Google Slides
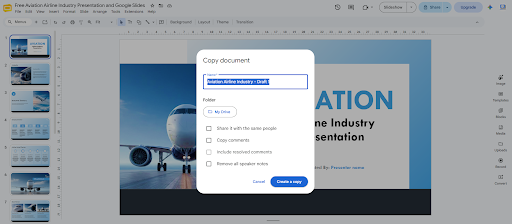
- Go to File > Make a copy > Entire presentation
- Rename the file so it is easy to find later, for example “Aviation Airline Industry – Draft 1”
If you downloaded a template as a .pptx file, upload it to Google Drive, right-click it, and choose Open with > Google Slides to convert it automatically.
Step 2: Customize the Theme, Colors, and Fonts
This is where a template starts to feel like your brand instead of a generic download.
- Click Slide in the top menu, then select Edit theme.
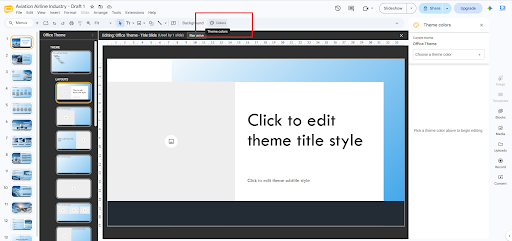
- In the theme editor, click on any color swatch to open the palette and enter your brand’s exact hex codes.
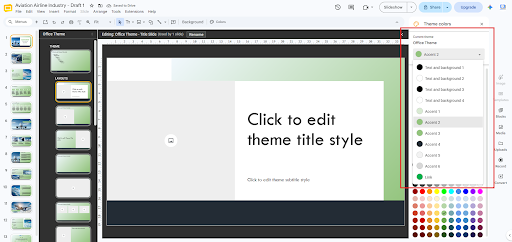
- Update the font pairs under Theme fonts, one for headings and one for body text.
- Changes made here apply across every slide automatically, so you only need to do this once.
Consistent colors and fonts are one of the biggest factors that separate a polished deck from a rushed one. If you are unsure which colors work well together, most professionally built templates, including the ones on SlidesBrain’s free Google Slides themes and PowerPoint templates library, already come with tested, cohesive palettes so you are not guessing.
Step 3: Replace Placeholder Text and Images
Templates ship with dummy text and stock photos so you can see the layout in action. Swapping these out is usually the most time-consuming part, so work through it slide by slide.
- Click directly on any text box to edit the copy.
- To swap an image, right-click it and choose Replace image, then upload from your computer, Google Drive, or a URL.
- Keep sentences short on slides. A deck is a visual aid, not a document, so trim anything that reads like a paragraph.
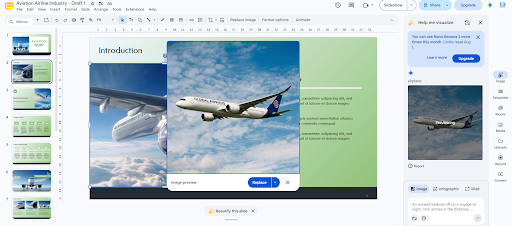
If a slide layout does not fit your content, do not force it. Use Insert > New slide and pick a different layout from the same template rather than cramming information into a box that was not built for it.
Step 4: Edit the Slide Master for Global Changes
If you want a logo, page number, or footer to appear on every slide, do not add it slide by slide. Use the master.
- Navigate to the top menu and select View > Theme Builder (or click Slide > Edit theme).
- Select the top layout (the master slide) to make changes that cascade to all layouts
- Add your logo, adjust placeholder positions, or set a consistent footer here
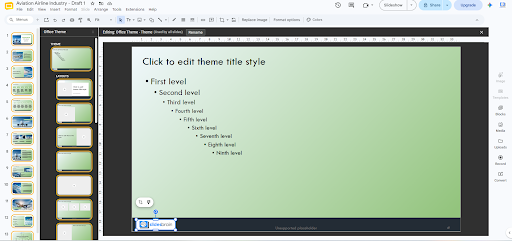
- Click Close Editing: Office Theme when finished.
This single step saves the most time in any customization workflow, especially for decks with 20 or more slides.
Step 5: Add Charts, Icons, and Visual Elements
Static text gets ignored. Visuals get remembered. Once your base layout is set, strengthen it with supporting visuals.
- Use Insert > Chart to pull live data from Google Sheets directly into your slide.
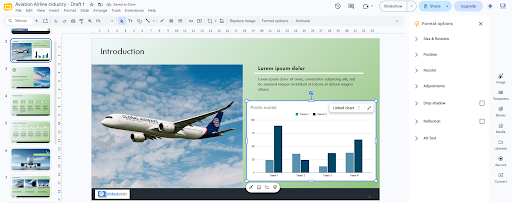
- Add icons through Insert > Image > Search the web, or use a dedicated icon set for a more consistent look.
- Use Insert > Diagram for org charts, process flows, or timelines instead of building them manually.
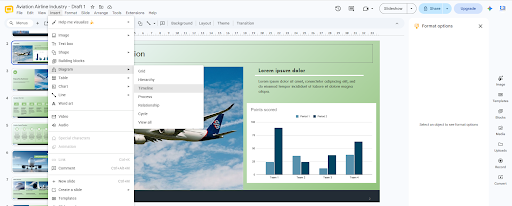
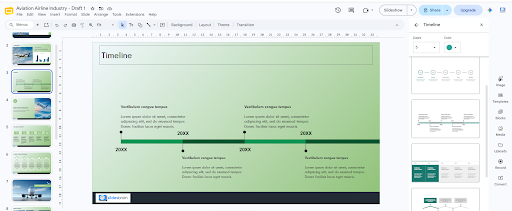
Templates that already include smart infographics and diagram placeholders save significant time here, since you are editing existing elements instead of building from a blank canvas. This is exactly the kind of structure SlidesBrain builds into its templates across categories like business decks, pitch decks, and education slides.
Step 6: Check Alignment and Consistency
Before you consider the deck finished, do a full pass focused only on visual consistency.
- Are all title text boxes aligned to the same position across slides?
- Is font size consistent for the same content type, such as headers or bullet points?
- Do image sizes and spacing feel balanced, not stretched or cropped awkwardly?
- Give your presentation an instant visual upgrade with the built-in AI tool. Simply go to Slide > Beautify this slide or select the “Beautify this slide” button, and let Gemini automatically transform your slide with refined layouts, enhanced visuals, and professional design elements.
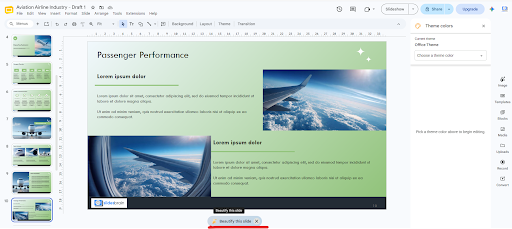
Google Slides has built-in alignment guides that appear automatically when you drag an object near another element. Use them instead of eyeballing placement.
Step 7: Export or Share Your Final Deck
Once customization is complete, decide how the presentation will be delivered.
- File > Download lets you export as PDF, PPTX, or image files
- Share allows you to control view and edit access for collaborators
- Present mode lets you preview exactly how the audience will see it, including any transitions or animations
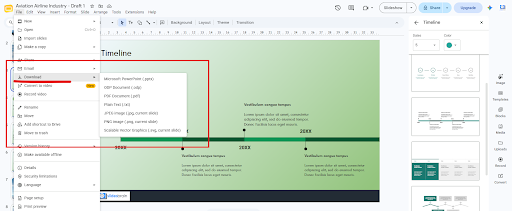
Always preview in presentation mode before the actual meeting. It is the easiest way to catch a misaligned element or an image that got stretched during editing.
Common Mistakes to Avoid When Customizing a Template
Even with a strong template, a few habits can undo your work:
- Overloading slides with text. If a slide needs a scroll bar to read, it needs to be split into two
- Ignoring the slide master. Editing logos or footers slide by slide instead of globally leads to inconsistency
- Mixing too many fonts. Stick to two font families maximum across the entire deck
- Skipping a final proofread in presentation mode. Editing view and presenting view can look different, especially with animations
Why Starting With the Right Template Matters?
Customization is much faster when the starting point is already well structured. A template with a messy layout, low-quality graphics, or inconsistent spacing will fight you at every step, no matter how much time you spend editing it.
This is where SlidesBrain makes the process easier. Every template in the library is built with clean layouts, editable charts, and cohesive color systems from the start, so customization means adjusting details rather than fixing structural problems. Whether you need a business presentation, investor pitch deck, or a report-style layout, or something built specifically for classrooms and training sessions through the education presentation templates collection, the groundwork is already done for you.
If you want to practice the customization steps above without any cost, browse SlidesBrain’s free Google Slides templates and PowerPoint themes and download one to try. Every template works natively in both Google Slides and PowerPoint, so you are never locked into one platform.
Bottom Line
A customized Google slides template can help users prepare presentation that match their styles and requirement. If you are unable to customize Google Slides templates, try SlidesBrain custom-ready free templates from the website. Their unique design and customization tools can help you make the most impressive presentation in no time.
Ready to Build Your Next Presentation?
The fastest way to get a polished deck is to start with a template that is already built for customization. Explore SlidesBrain’s full collection of Google Slides themes and PowerPoint templates and find a design that fits your next presentation, then follow the steps above to make it entirely your own in under an hour.
Frequently Asked Questions
Question 1: Can I customize a Google Slides template without design experience?
Answer: Yes, Google Slides is built around simple menus for color, font, and layout changes, and most professionally designed templates already handle the harder design decisions for you.
Question 2: Do changes to the slide master affect slides I already edited?
Answer: Master changes apply to layout elements like logos, footers, and placeholder positions. Text and images you have already added to individual slides stay as they are.
Question 3: Can I use a Google Slides template in PowerPoint instead?
Answer: Most modern templates, including those from SlidesBrain, are built to work in both Google Slides and PowerPoint, so you can download and edit in whichever tool you prefer.
Question 4: How long does it typically take to customize a template?
Answer: For a 10 to 15 slide deck with a template that already has a clean structure, expect 30 to 60 minutes for a full customization pass, including text, images, and branding.